Are you constantly struggling with uneven printed layers? Is your printer leaving huge blobs and unwanted stringy plastic threads?
If your answer to those questions is ‘yes’ then you have come to the right place. The 3D print quality of products can be managed by some quick and easy remedies. Often, there are small technical errors that even experts miss. Here is your guide to improving the 3D print quality of your end products.
We will look at some formidable design changes that you can implement to improve the quality of 3D prints. Also, we will examine some common issues that all 3D printers face:
1. Stringy texture of plastic
2. Shifting of layers
3. Blobs on the surface
4. Ringing
5. Sagging or Drooping
6. Warping
Things to keep in mind during the design phase
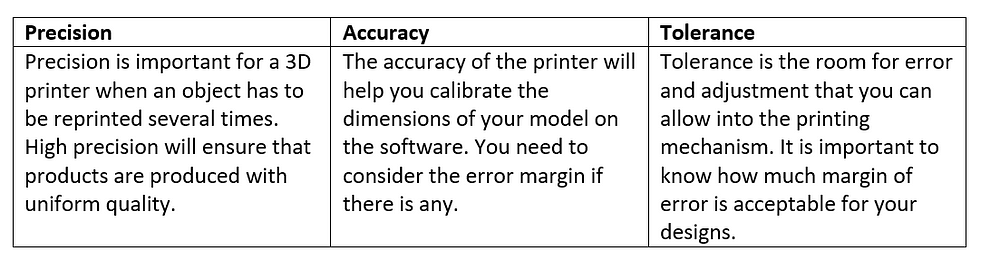
It is also important to understand the features of the 3D printer that you are going to use. Three key aspects account for making plausible adjustments in the settings.
- Precision
- Accuracy
- Tolerance
Even before you jump into production. There are some quality checks and assurances that you can take as a precaution to avoid obvious mistakes.
1. Keep a note of the surface quality
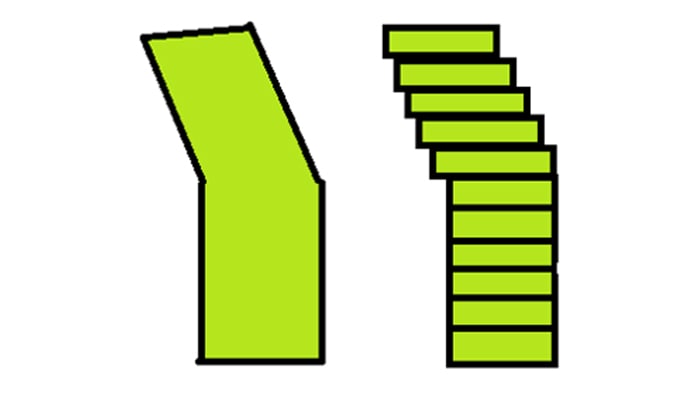
Avoid using inclined planes for your printing if you wish to create a shiny object. There is a phenomenon called the staircase effect that can make the surfaces look rough and edgy. Stick to horizontal or vertical planes.
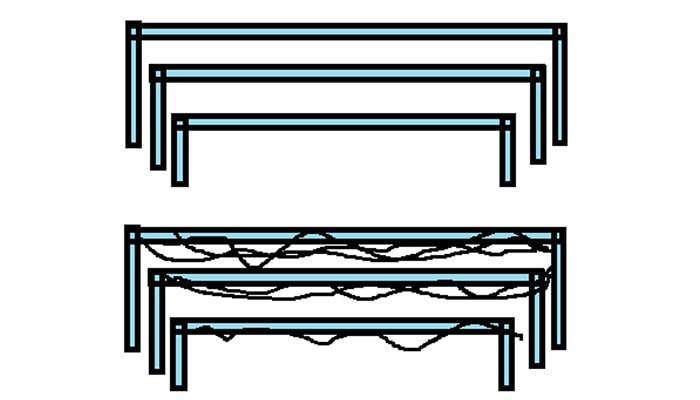
2. Minimize Shrinkage
The shrinking and expansion of material occur during the printing and cooling phases. The shrinkage of the material can cause the part to be out of tolerance. Thus, it is important to minimize the shrinkage as much as possible. It is to be noted that the shrinkage depends on the properties of the material in use. For example, ABS is more susceptible to shrinkage when compared to PLA. One way to deal with it is by using a uniform thickness in the walls. This will not allow large chunks of the material to come together. In the picture below you can see that the design on the right is a better alternative, as there is enough room for expansion.

3. Using minimal support structures
The overhanging parts of the model need support structures that would eliminate other problems that can ruin your prototype. The following types of models are usually incorporated with support structures.
a. Any surface that has an angle <45 degrees with the print plane
b. Horizontal long structures like a bridge
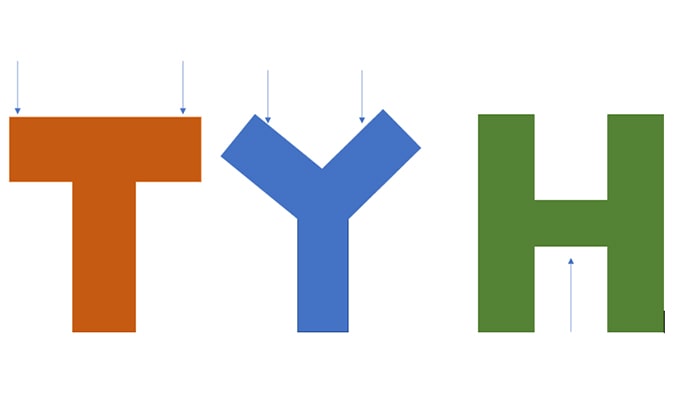
Fundamentally, it would be helpful to minimize the support structures by modifying the design itself. For example, if you take the two letters — ‘T’ and ‘Y.’ The Y figure can be printed without the support structure due to the angles on the ‘Y’ handles. Whereas a ‘T’ has an angle with a horizontal that is less than 45 degrees, this means support structures are required.
The design and plan phase of your production cycle can be utilized to prevent some common errors that have an impact on the 3D print quality of the final item. Don’t be afraid to experiment with different settings on your 3D printer. It will help you understand the various effects that certain settings can have on the end products. However, some obvious faults can leave you with a poor-quality 3D printed model. We can further look into some more preventive methods which will help you avoid rookie mistakes.
Quick Fixes for 3D print quality issues
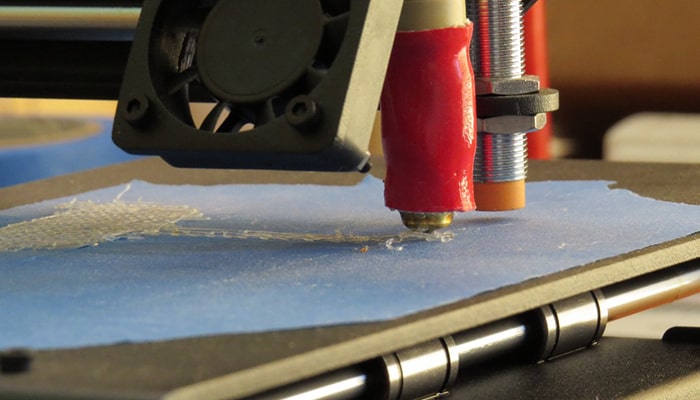
1. Stringy texture of plastic
Problem
The end model often has strands of plastic strings left behind. They are also referred to as ‘hairy’ prints. The cause of this issue lies in the way the extruder moves. Every time it picks a new location, plastic oozes out from the nozzle leaving an unwanted strand. This has a terrible impact on the 3D print quality of your prototypes or final models. This can be fixed by an automatic setting which almost all 3D printers have — retraction.
Solution
The first thing that you need to look at is the settings for the retraction feature. ‘Retraction distance’ is used to measure the amount of plastic that comes out of the nozzle. The idea is to prevent the plastic from oozing while it is moving to a new spot. Different kinds of extruders have different recommended retraction distances that can prevent oozing. E.g., Bowden extruders need 15 mm of distance while direct driver extruders need 0.5–0.2 mm of distance.
Another reason for oozing could be due to excessive melting of the plastic in high temperatures. The melting can lead to the leaking of plastic from the nozzle. In this case, adjust the temperature by 2–5 degrees and see if the stringing has stopped. Also, make sure that your 3D printer has a cooling fan close to the nozzle.
Play around with the settings of your 3D printer to find the right fit for your prints. Understand that stringing happens due to the long movements. Adjust the settings of the X-Y axis of your printer to achieve a good 3D print quality.
.jpg)
2. Shifting of layers
Problem
To get the precise dimensions of your model, the tool head of a 3D printer needs to move to the correct place and print the layer. If you’re not using costly embedded control systems, there is no other mechanism for the printer to check whether the location is precise and accurate, in other words — there is no feedback mechanism for the system. Therefore, if the printer moves in the middle of the process and the tool head get displaced, there are chances that the layers will shift and create a deformed structure. This has a huge impact on the quality of your 3D print model. There are some simple ways to overcome this issue.
Solution
The most obvious way to fix this problem is to control the printing speed. The default settings of the printers can be changed to a speed that prevents the shifting of layers. The X-Y axis movement speed needs to be reduced to an optimal setting that would suit your design requirements. Also decreasing the acceleration and jerk values on your firmware can reduce the chances of layer shifts. At Fabheads, we provide calibrated motion settings for each tool head that we use with our FibrBot printers.
Even after the speed adjustment, if you see that layers are being formed unevenly. Then look at the belt tension of the printer. Belt tension is a key element that drives the pulley action of the printer. If it is too loose or too tight, then the tension will cause issues for your printer.
Another reason for the layer shifts can be fluctuating power source to the printer which can cause erratic motor movement. Ensure that the power source to the printer is stable by using a UPS or providing suitable noise filters with the power source.
3. Blobs on the surface
Problem
It is disappointing to find blobs planted on the flat surfaces of your 3D models. This issue is quite common among 3D printed products. It occurs when the extruder is interrupted or has to re-start printing from the same spot. It tends to print on top of the portion that is already printed. This leads to the formation of a tiny blob at that particular spot. It is very hard to cut it off after the printing and cooling process. Let’s look at how this issue can be managed.
Solution
Like stringing, this issue can be fixed using retraction settings as well. However, before you dive into correcting the settings, it is important to identify if the blobs appear –
- At the start of the print
- At the end of the print
In case one, the retraction setting needs to be adjusted so that the extruder knows exactly at what point the printing needs to resume. The second case can be fixed using ‘coasting.’ It will pause the printer a few moments ahead of the end time (set in the settings). These minor adjustments can elevate the 3D print quality of your end products.
4. Ringing
Problem
The unwanted ring patterns often appear on surfaces while 3D printing. It occurs at the edges or corners. The sudden change of direction for the extruder sometimes leads to vibration. While it may look like a cool effect, on flat, even and geometrical objects ringing can look awful. This can be easily managed by changing a few settings on your printer.
Solution
Reasons for ringing (also called ghosting):
- Adjustment in the firmware of the 3D printer is required
- Fast movement of the printer
- Mechanical discrepancies
The firmware of the 3D printer controls the acceleration of the tool head. This acceleration can be changed from the firmware settings. Often, reducing the acceleration by a few notches can automatically prevent the ringing. The next point to be looked at is the printer speed, as mentioned above (for layers shifting issue) the X-Y axis speed needs to be adjusted here as well. The third point refers to the 3D printer itself, check if there are any issues with the surface board placement. Also ensure that table on which the printer sits is not shaky. Also, ensure that the 3D printer frame is rigid and the fasteners haven’t loosened over continuous usage. Ensuring these minute details can help you avoid ringing caused by vibrations.
5. Sagging or Drooping
Problem
When a block of plastic has no support in the middle, there is a tendency for the middle portion to droop down a little after rapid cooling. The lack of support causes this sagging effect (more prominent in the long bridge-like structures). To achieve the best 3D print quality for bridge-like structures manage the settings before you start printing or use support structures.
Solution
The infill direction plays a huge role in printing bridge structures through the 3D printer. Check if the axis selected is accurate on the software. Most printers take care of the infill direction automatically.
The next thing that you need to check is the bridging settings. It will highlight the bridge section for the user. Once that is done, the printer takes care of the portions that can sag. The bridging settings in a printer are set to print with very specific cooling temperature, speed, etc. Enabling default bridge settings can contribute to improving the 3D print quality of your models. In case you still find issues with the long bridge structure, add some supporting clips that will help balance the model and printing will go seamlessly.
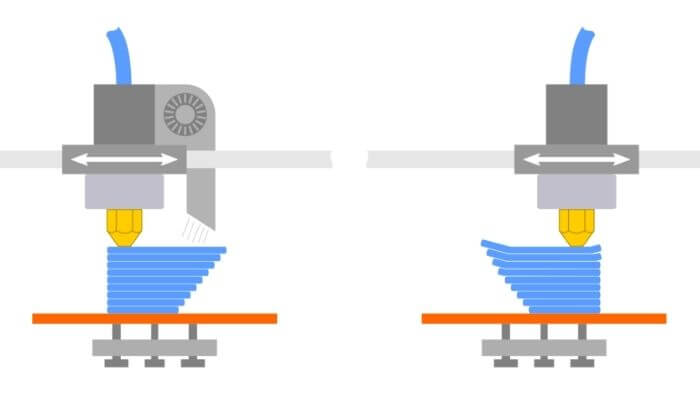
6. Warping
Problem
Have you ever printed a perfect 3D design model that you are proud of? And soon after resting it, you notice that the ends of the model curl up or your overall model shrinks and looks skimpy. This unfortunate incident is referred to as warping which diminishes the 3D print quality of products. When you use materials such as ABS, it is required to work in high-temperature zones. The wait time for cooling is also high, hence some internal structural changes occur which cooling. Some tips can help you avoid this situation.
Solution
Warping can occur when the top layers get printed and the bottom layers begin to cool off too soon. This is where a heating bed will keep hot for the entire duration of the printing. An optimal temperature would be around 100–120 degrees Celsius. Also, a cooling fan near the nozzle can help the top layers cool down a little faster so that the layers on the bottom are not impacted too harshly. It is also recommended to shift your printer from an open environment to a closed chamber. That will help with insulation and regulation of temperature for the printer.
The 3D print quality of your products can be managed by making changes in the overall set-up of your printer, the back-end software settings, maintaining optimal printing temperatures, or using the best possible equipment (nozzles, extruders, etc.) for a fine printing experience. Small tweaks and fixes can go a long way in improving the 3D print quality of your products.
Conclusion
This guide contains a curated list of ways in which you can improve and manage the 3D print quality of your designs. Here is a quick run-through for all the areas that we discussed throughout the article.
1. Plan the design of your products to avoid blunders while printing
2. Focus on simple alterations in your design to help you avoid any major mishaps
3. Look at the various settings that would help you avoid some printing defects like
a. Blobs on the surfaces
b. Stringing
c. Warping
d. Ringing/Vibrations
e. Bridging.
4. Always try a sample and avoid committing to the final design too soon.
We hope that this article helped you improve the 3D print quality of your products. Share with us some of your worst 3D printing nightmares (a picture would be great too !) and how you fixed it in the comments section below